Poor quality print outs are a common problems you are likely to encounter with a printer ink cartridge and below are 12 simple steps you can try to get your printer cartridge working again.

Click Here to Get Multipack Offers For Ink Cartridges
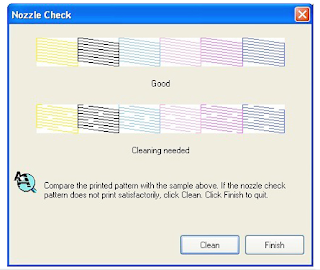
- You may experience streaky or faint print outs even though you know for certain that there is still ink in the cartridge. Performing a nozzle check will confirm if the print heads are blocked.
- Go to the maintenance section of your printer, this is be located in the printer utility section where you would also perform the head cleaning cycle.
- Once in the maintenance section you can choose to print out a test page. This will tell you if your ink cartridge is actually printing properly as the print out should display clearly printed lines in the four colours; black, cyan, magenta and yellow.
- If you have a test print that shows incomplete lines or broken lines (you will be shown on screen a sample of what is the result of a correctly performing ink cartridge), you will be required to perform a head cleaning cycle.
- Let’s say that the yellow and cyan lines are fragmented but the black and magenta are not, you will be required to perform a head cleaning cycle that will clean all four print heads as it is not possible to clean one ink cartridge of your choice using the printer utility section.
- Usually it will take more than one head cleaning cycle to clear the blockage on the cartridge, it may take up to 3 or 4 attempts. The thing to remember is that every time you perform a head cleaning cycle the printer uses ink from the ink cartridge to force the ink through the blockage. It’s possible to empty a set of ink cartridges by performing 7 or 8 cleaning cycles in an attempt to unblock a print head.
- This is an unavoidable side effect of head cleaning and this may be as a result of the printer lying dormant at home or in the office for a long period of time without use. If possible, try running a sheet of paper through your inkjet printer at least once a fortnight. Hardening of the ink through lack of use is the most common reason for blacked heads or poor quality prints.
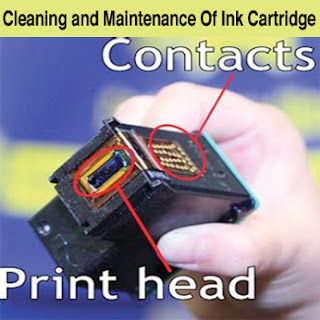
- In the case of an integrated print head where the freeing up of a blocked ink cartridge does not respond to the head cleaning cycle it may be necessary to explore some of the options below.
- Taking a sheet of paper towel and folding it 2 or 3 times to increase the thickness, dampen with some distilled water. Don’t over soak the paper towel, as we need to draw the ink out of the ink cartridge. It is best to use distilled or purified water, as this will prevent further damage to the print head.
- Wipe the print head along the direction of the print head using the paper towel to remove any residue that may be causing the blockage.
- The print head should actually look clean and shine after you have successfully wiped it. If you find that there is too much ink on the print head use more clean damp paper towel to further clean it.
- When you have cleaned the print head, take a fresh piece of paper towel, fold it again and slightly dampen it. Hold the new paper towel against the print head to see that now the ink cartridge is primed with the ink flowing each time you wipe the cartridge with moderate pressure. Simply reinstall the ink cartridge and proceed to print.
.jpg)

Click Here to Get Multipack Offers For Ink Cartridges

No comments:
Post a Comment