A frequently asked question is how do you actually correctly install a Canon ink cartridge? Outlined below are 5 easy steps as a guide to installing your Canon ink cartridge. Some models may vary, but these tips are for the Pixma MP series of Canon printers.
- Removing the empty cartridge and installing replacement.
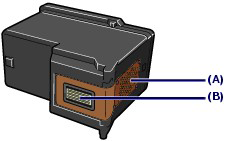
 When you remove an ink cartridge you should always replace it immediately with a new cartridge. You should never leave the printer without an cartridge installed either empty or full. When you have removed the empty cartridge, remove the replacement ink from the packaging paying careful attention not to touch the copper 'chip' area 'A' or print head nozzles ‘B’, see diagram '1'. Contaminating either of these areas is likely to cause problems with the printer recognising the cartridge. Once a cartridge has been installed, never remove it and leave it exposed, as this will cause the cartridge to dry out.It's worth noting that when a canon ink cartridge runs out you may still be able to use the remaining colour for a short time, but the quality will be noticeably reduced, as it may need some ink from the empty cartridge to produce the correct colour. Colour ink may be used even when the document printing is black and white. Like wise, if there is head cleaning operation is necessary, the printer will require ink form both colour and black and white.
 - Open the printer.
With the power switched on, raise the scanning unit of the printer to reveal the inner working of the printer and it's ink cartridges. There may be a support leg for the scanner that will lock in place enabling you to use both your hand for the ink cartridge replacement. This should move the cartridge carrier to the replacement position automatically.
Remember not to touch the carrier until it stops and has moved into the replacement position. Be careful not to rest any objects on the scanner cover in case they fall down into the printer and prove difficult to retrieve. Also, do not touch any of the working parts inside the printer, as the printer will still have the power switched on. If you happen to have the scanner unit open for 10 minutes, the cartridge holder will move to the right hand side, if this happens simply close the scanner unit and re-open.
- Removing the ink cartridge.
Pinch the tabs that are securely holding the ink cartridge in position. Move to the open position unblocking the cover. Remove the canon cartridge and set down on a tissue, as there may be residues of ink that can damage clothing or a surface. Please be careful with the disposal of any ink cartridge, take the empty cartridges to your local recycling centre if there is no returns envelope with the cartridge you have opened. Remove the replacement cartridge from it's packaging and gently remove the protective tape from the cartridge. Be careful not to shake the ink cartridge as it may spill ink. - Installing the replacement Canon ink cartridges.
Fit the cartridge into the cartridge holder and press down until you feel and hear a click. The colour ink cartridge will fit into the left hand slot of the printer and the black into the right. Close the cartridge cover with enough pressure that it clicks into position. If the ink cartridge cover is tilted then this indicates that the cover is not correctly closed. Please not that the printer will not operate unless both black and colour Canon ink are installed correctly. Close the printer, first raising the cover to allow the scanner support leg to fold into the printer. The printer will usually perform a head cleaning cycle immediately after the replacement; please do not perform any other functions until the printer has completed this action. - Troubleshooting
From time to time you will experience problems when installing the Canon ink cartridges. If you are using a compatible ink cartridges it may be that the printer will not read the ink level of the cartridge and declare it empty. If this happens, simply hold down the stop button for 5 seconds (this is marked with a red triangle on the operation panel of the printer). This will bypass the printer's ink level circuit and the printer will print as normal.

No comments:
Post a Comment