
Below are listed some useful tips on replacing ink cartridges in Epson printers. Each series of Epson printer may have it’s own method of ink cartridge replacement; I have tried to cover the more popular current models.

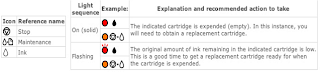
The printer will display a message when the ink is low. An amber or red light will be displayed next to the ink/maintenance symbol or the stop button on the printer’s control panel. See diagram.
Replacing ink cartridges on printers that don’t have an LCD panel.
The printer will display a message when the ink is low. An amber or red light will be displayed next to the ink/maintenance symbol or the stop button on the printer’s control panel. See diagram.
- Make sure the printer is switched on. The power light indicator should be on but not flashing.
- Lower the paper output tray and open the printer cover.
- Press the ink symbol button and the print head will move the ink cartridge that needs to be replaced into line with an arrow on the carrier. On some Epson printers, the power light will begin to flash when the carrier stops at the empty ink cartridge, thus identifying the cartridge to be replaced.
- When you are pressing the ink button do not hold this button for more than 3 seconds as on some models it may initiate a head cleaning cycle.
- Also, never force or manually try to move the print head by hand as it may result in damage to the printer.
- Open the ink cartridge cover (lift the flap) and remove the empty ink cartridge by pinching the two ends of the cartridge as you remove it.
- Remember to dispose of the empty ink and toner cartridges safely, take to a recycling centre where possible.
- If ink gets on your hands wash immediately with soap and water.
- Remove the ink cartridge form the box and shake 4 or 5 times before opening the bag. Don’t shake the cartridge after you have removed it from the bag as this may cause a leak.
- After roving the ink cartridge from the protective cover, insert the cartridge vertically into the cartridge holder and push down gently until it clicks. The ink cartridge should fit in easily and not require any excessive force to locate it in position.
- Try to be careful not to damage the hooks that are on the side of the ink cartridges.
- It is also very important that you don’t touch the copper ‘chip’ on the cartridge as this may affect the cartridge recognition.
- If you run out of ink and you don’t have a replacement ink cartridge, it is best to leave the empty cartridge in the printer to prevent dust or the drying out of the print head.
- The colour of the ink cartridge you are replacing is easily identifiable by the colour marking on the cartridge.
- When you have finished replacing the cartridges close the cartridge and printer cover.
- Next, press the ink icon button this will begin the charging of the ink within the printer. It may take a couple of minutes to complete the charging. When the ink charging is complete, the printer will either return to the printing position or give you an indication that another cartridge needs to be replaced.
- It is usually recommended that a head cleaning procedure be carried out after every ink cartridges replacement.
- This operation can be carried out manually on the printer or via your computer.
- If you hold down the ink icon button for more than 3 seconds a head cleaning operation should begin automatically.
- Alternatively, on your computer, find printers > properties > maintenance > head cleaning.
No comments:
Post a Comment